Final Project Presentation – Mauricio Contreras

Assignment,Final Project,Robotics,Submission,Technique — mauricio.contreras @ 11:47 pm

My fourth and final milestone and final project presentation involved real time driving of the movement of a simulated robotic arm with a haptic feedback capable gestural controller. By this time, I was interfacing with an actual ABB IRB 6640 industrial robot, and my controller was a smartphone. The IMU of the smartphone allows to read its orientation, and thus allows for mapped gestural control of the position of the head of the robot based on the tilt of the smartphone on each of its own axis. The haptic feedback is provided by the smartphone’s vibrator. Through the development up until the 3rd milestone, I had concluded that even though I had implemented already the motion control system and vibration upon the robot touching “virtual walls” (preset coordinates beyond which motion is not allowed), with the smartphone vibrating upon touching the wall, the “quality” of the motion I was getting was not enough to make it a desirable sculpting tool. I then shifted the priorities of the project in order to get better motion characteristics, as opposed to exploring further on the haptic feedback side, which up to now is only binary (touch = max vibration, not touch = 0 vibration).

Motion experiments

The motion of the ABB industrial robotic arms is limited to receive targets (6 degrees of freedom points: 3 coordinates for position and 3 for head orientation/rotation) and the motion path between them cannot be interrupted. This means updating the next target upon real time variation of the driving variable (in this case the smartphone’s orientation) is essentially not possible. I say essentially because there is a parameter of the movement instructions called “zone”, which specifies how near the head of the robot needs to be to the current target being pursued for the instruction to be considered complete, and then move to the next one. “zone = fine” means the targets have to be reached precisely. “zone = zX”, where X belongs to a group of preset numbers, allows the robot to reach “near” the target (how near is specified by the different X). Upon reaching the “zone” around the target, the next instruction in the program starts being executed.

With the above information, I considered the following alternatives for improved motion, grouped mainly in two categories:

A. Better target generation
1) Low pass filtering of the orientation
2) Keep a reception buffer with at least one more target than the current instruction (for “zone!=fine” to work well)
3) Smart generation of targets based on gesture recognition

B. Optimization of movement commands parameters
1) Setting of correct speed, step size and zone.

Out of all the available options, I started by B.1. The original motion to compare against is the fixed speed (max), fixed step size (usually 5-10 cm) and zone=fine of the first motion test, as shown in the video below:

The main progress in this direction was achieved considering variable step size in each axis based on the change of magnitude of the rotation in that axis. Also, variable speed, based on the max of the absolute values of all rotation components. Static weights were applied so that the largest step size would be around 10 cm. and the speed varies between 0-100%, with the max speed of the robot being 200 mm/s (in the manual mode of operation which is what I’ve been allowed to use). The result of these parameters may be seen below:

The resulting motion, albeit keeping its piecewise nature, seems to be much better suited to precise yet responsive control, with very little motion being performed when the rotation is near 0 (smartphones own axis aligned with the worlds coordinate system, as described here) and larger displacements being performed due to higher magnitude rotations. This resembles the way humans work on a physical piece in the sense that when precision is required movements are slow and short/local, whereas the movement between areas of precision is by definition non precise and therefore is optimized with greater speed and less accuracy. This parameter optimization was shown in the final project presentation. The final precision reached, along with smartphone vibration upon touching virtual walls (“sandbox”) was shown both in free air and also with a very simple demo. It consisted in a pencil being attached to the arm’s head and a canvas layer on top of a table, where people could draw (safely, since a “sandbox” was created which would not allow the robot to pierce through the table or adjacent wall). A video of the presentation was taken:

Assessment

The overall goal of the semester was to give a step towards an overarching ambitious project for my degree, related to being able to sculpt with a robotic arm. For this class the goal was to get acquainted with the workflow around the robotic arms present in dFab, the Dept. of Architecture digital fabrication laboratory. The factual outcome would be to use the same software that previous users are familiar with and be able to connect a gestural controller and haptic feedback capable device to drive the robots. As stated this was achieved, but the following was learnt during the project:

  • Responsiveness: real time driving of the robot seems to be crucial in order for the user to feel she/he is in actual control of the robot. The slower the response time, the harder it is to relate one’s own motion to that of the robot in an intuitive way.
  • Quality of the motion: The piecewise motion obtained due to the constraint imposed by the ways the robots are programmed (the lowest layer accessible to the user being RAPID) greatly reduces the quality with which users seem to regard the quality of the motion. “Dumb” and “robotic” were adjectives used repeatedly by users/observers. Even when good parameter choice for motion commands aided the situation, this is a key aspect to address in future development. There are other robots which are made to more closely resemble human arms and allow better real time interaction, but my degree is based on architecture and on the practical side of things I want to explore and also give dFab a creation tool useful and tuned to their setup, which means using the ABB robots. My intuition tells me that A.3, smart target generation, may provide the greatest improvement and is the next step I intend to explore in future courses.
  • Mapping: the final setup maps smartphone orientation to position of the robot’s head. Whereas it proves the concept of gestural control, it is indirect (as opposed of driving position with position which was the original intent) and the final degree of control available to the user seems far from what is desired. Presentation observers had a really tough time trying to draw on the paper provided. As it is now, the controller more resembles a 3 degree of freedom joystick, and very likely an of the shelve one that would be better in some sense could be purchased. Again my intuition tells me direct mapping (position to position and orientation to orientation) is required for “natural” control, and since my research so far points that stand alone positioning through an IMU is not solved (at least in free air) and cannot be applied to the project, seems like external sensor based technologies, such as visual motion capture (“mocap”) are necessary.
  • Why?: the question came back again from many observers in the presentation. Since the example application was drawing, many commented on the fact that humans can draw much better than the robot did. To this I replied yes, absolutely, since a naturally feeling motion has not been achieved yet, but more importantly, because the idea of using an industrial robotic arm is in tasks that would be impossible or at least very difficult for a human to do directly and cumbersome to do with a power tool, like bending/milling/etc. very hard/large materials, and that with precision and speed. Essentially, a big industrial robotic arm is made for high power/high precision/large sized applications, so anything that needs a very powerful hand tool, a position hard to reach and very high precision work in either/both scenarios a robot, with the correct instructions, can do better than bare hand. I think now that it is essential to somehow preserve the high precision nature of the robot, but still explore the liveliness of human physical sculpting. A way to do this is with a mixed analog/digital instruction set, such as in drawing software which mixes free form drawing with a mouse, but also allows for precise mathematical operations to be performed on top of that. This is tried and true for sculpting in the virtual world (any CAD software), hence it is likely that some of it can be translated in a useful way to the physical world. I intend to build this mixed human driven/software enhanced toolkit.

Code

Rapid, Android. See the Future CNC course website and ABB’s full reference for further information on RAPID.

Acknowledments

I would like to thank very much Mike Jeffers, Madeline Gannon, Zack Jacobson-Weaver, Ali Momeni, Jeremy Ficca, Joshua Bard, Garth Zegling and CMU’s Manipulation Lab for their incredible support to this project.
Final Project: Digital Tabla – David Lu

Assignment,Final Project — David Lu @ 11:04 pm

Presentation:
The original plan was to collaborate with Jake in creating a composition of live electronic music, where Jake would control a monophonic instrument with lots of continuously varying modulation, and where I would provide percussion accompaniment that would be responsive to tempo changes, interruptions, and general groove.

However, we didn’t have time to figure something out, and I also couldn’t even get my instrument working, so I worked with what I had: LEDs that flashed when I struck the drums. Honestly, the LEDs were almost an afterthought, and more for helping me visualize the responsiveness of my instrument (it’s not as responsive as I would like it to be), and they were not meant to be the primary focus, but that was all I had 😐

So, in the few minutes before presentation, I decided to shut off the lights to glamorize the flashing lights.

Documentation:

Demo video:

Future plans:

I still haven’t  gotten the code to send out MIDI messages. I will need to do that.

But the more important thing is to make the sensors more sensitive and the code more accurate. For that, I will have to redo the right hand drum to its original design, probably also adding a gratituous number of piezos in parallel as well.

Replacing the breadboard with a protoboard is also something I should consider.

Final Project Presentation – Ziyun Peng

Assignment,Final Project,Max,Sensors — ziyunpeng @ 10:20 pm

Face Yoga Game

Idea

There’s something interesting about the unattractiveness that one goes through on the path of pursuing beauty. You put on the facial mask to moisturize and tone up your skin while it makes you look like a ghost. You do face yoga exercises in order to get rid of some certain lines on your face but at the mean time you’ll have to many awkward faces which you definitely wouldn’t want others to see. The Face Yoga Game aims at amplifying the funniness and the paradox of beauty by making a game using one’s face.

Set-up

Myoelectric sensors -> Arduino —Maxuino—> Max/MSP (gesture recognition)—OSC—> Processing (game)

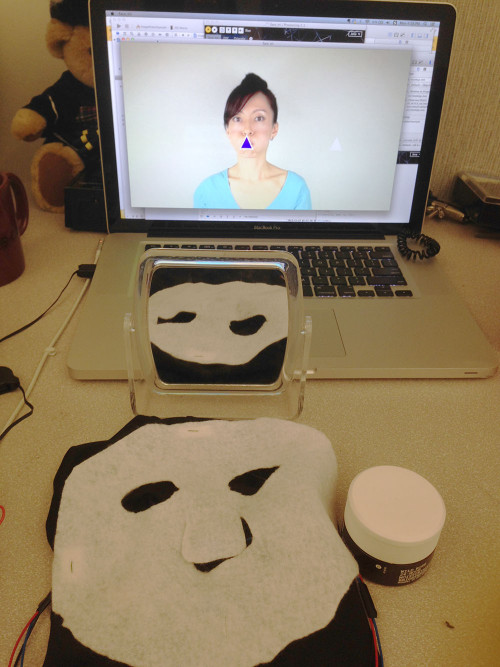
Myoelectric sensor electrodes are replaced with electric fabrics so to be sewed onto a mask that the player is going wear. The face gestures that correspond to the face yoga video are pre-learnt in Max/MSP using the Gesture Follower external developed in IRCAM. When the player is making facial expressions under the mask, it will be detected in Max/MSP, the corresponding gesture number will be sent to Processing to determine if the player is performing the right gesture.

How does the game work?

Face_Yoga


The game is in the scenario of “daily beauty care” where you have a mirror, a moisturizer and a screen for game play.

Step 1: Look at the mirror and put on the mask

Step 2: Apply the moisturizer (for conductivity)

Step 3: Start practicing with the game!

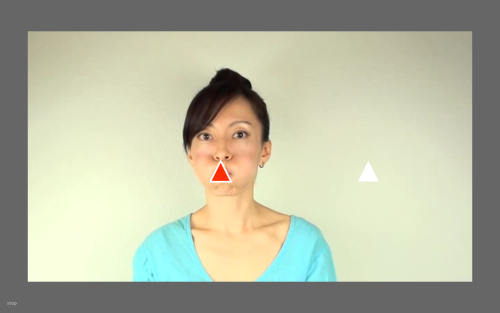
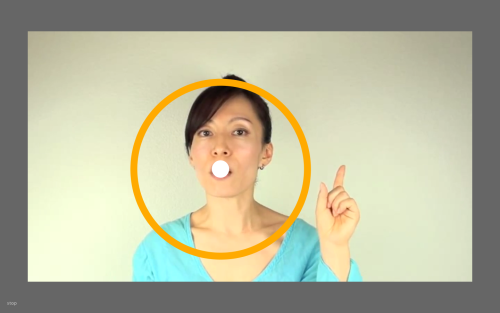
The mechanism is simple, the player is supposed to do the same gesture as the instructor does in order to move the object displayed on the screen to the target place.

The final presentation is in a semi-performative  form to tell

Final Project Presentation — Haochuan Liu

Assignment,Audio,Final Project,OpenCV — haochuan @ 10:09 pm

Drawable Stompbox

Write down your one of your favorite guitar effects on a piece of paper, then play your guitar, you will get the sound what you’ve written down.

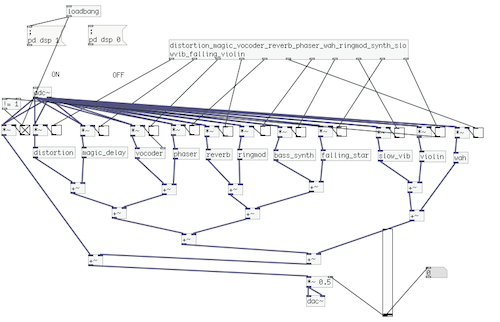
Here is the final diagram of this drawable stompbox:

Screenshot 2013-11-27 22.11.45


After you write down the effects on a piece of paper, the webcam which is above the paper will capture what you’ve written into a software written in openframeworks. The software will analysis the words and do the recognition using optical character recognition (OCR). When your write the right words, the software will tell puredata to turn on the specific effect through OSC, you will finally hear what you’ve written when you play your guitar.

The source code of this software can be found here.

Here is a demo of how this drawable stompbox works.

Feedback from my final presentation:

I have got a lot of good idea and advice for my drawable stompbox as below:

1. Currently writing down a word to get the effects has no relationship with ‘drawing’. It is more like a effect selection using word recognition.

2. I was thinking of drawing simple face on the paper instead of just boring words. How about using a webcam directly to scan real people’s face, getting their emotion on their face and then find the relationship between different faces and different effects.

3. Words recognition is so hard, for there are a lot of factors to make it doesn’t work well, such as the hand-writing, the resolution of the webcam and the light of environment.

Following work:

For the following weeks, I decide to make my instrument a real drawable stompbox. I will begin with a very simple modulation:

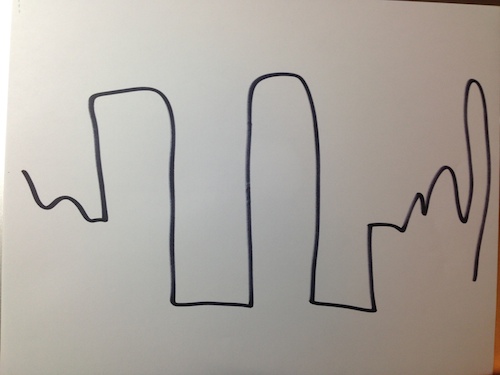
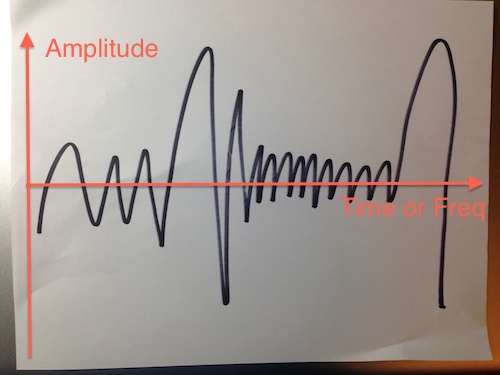
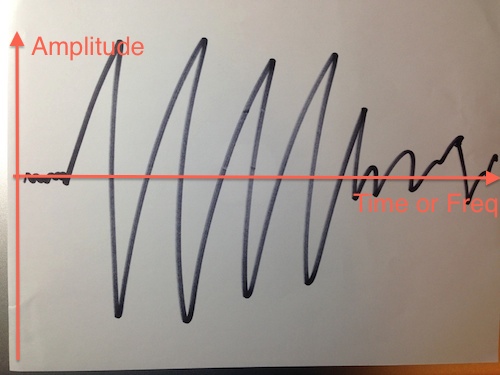
People can simply draw the ‘wave’ like this:

2013-11-27 23.03.24 2013-11-27 23.03.34 2013-11-27 23.03.43

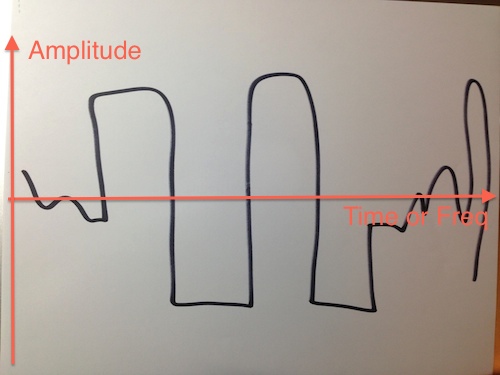
From this drawing, it is easy to define and map the amplitude and the frequency.

2013-11-27 23.03.43 2013-11-27 23.03.34 2013-11-27 23.03.24


Then I will use the ‘wave’ from the drawing to do a modulation with the original guitar signal. People can draw different type of waves to try how the sound changes.


Final Presentation – Spencer Barton

The Black Box

Put your hand into the black box. Inside you will find something to feel. Now take a look through the microscope. What do you feel? What do you see?

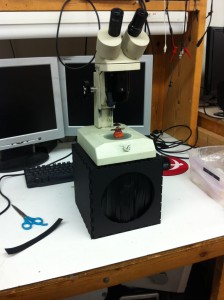
The Box and Microscope

2013-11-19 20.00.16

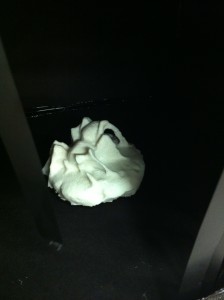
Inside the Box

2013-11-19 19.43.03

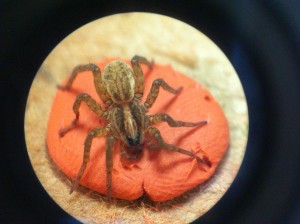
Under the Microscope

2013-11-17 00.03.12

When we interact with small objects we cannot feel them. I can hold the spider but I cannot feel it. The goal here is to enable you to feel the spider, to hold it in your hand. Our normal interaction with small things is in 2D. We see through photographs or a lens. Now I can experience the spider though touch and feel its detail. I have not created caricatures of spiders, I copied a real one. There is loss of detail but the overall form is recreated and speaks to the complexity of living organisms at a scale that is hard to appreciate.

The box enables the exploration of the spider model before the unveiling of the real spider under the microscope. The box can sense the presence of a hand and after a short delay, enabling the viewer to get a good feel of the model, a light is turned on to reveal the spider under the microscope.

Explanation of the Set-up

The Evolution of Ideas

As I created the models I found that my original goal of recreation was falling short. Instead of perfect representations of the creatures under the microscope, I had white plastic models that looked fairly abstract. The 123D models were much more realistic representations because of their color. My original presentation ideas focused around this loss of detail and the limits of the technology. However, what I came to realize was were the strengths of the technology lay: the recreation of the basic form of the object at a larger scale. For example someone could hold the spider model and get a sense of abdomen versus leg size. Rather then let someone view the model I decided to only let them feel the model.

Feedback and Moving Forward

The general feedback that I got was to explore the experience of the black box in more depth. There were two key faults with the current set-up. First the exposure of the bug under the microscope happened too soon. Time is needed for the viewer to form a questions of what is inside the black box. Only after that question is created should the answer be shown under the microscope. The experience in the box could also be augmented. The groping hand inside the box could also be exposed to other touch sensations, it could activate sound or trigger further actions. The goal would be to lead the experience toward the unveiling. For example sounds of scuttling could be triggered for the spider model.

The second piece of feedback lay with the models themselves. First it was tough to tell that the model in the box was an exact replica of the bug under the microscope. The capture process losses detail and the model creation through 3D printing adds new textures. The plastic 3D models in particular were not as interesting to touch as the experience was akin to playing with a plastic toy.

To recognize and rectify these concerns this project can be improved in a few directions. First I will improve the box with audio and a longer exposure time. Rather then look through the microscope I will have a laptop that displays the actual images that were used to make the model. The user’s view on this model with then be controlled by how they have rotated the model inside the box.

I will try another microscope and different background colors to experiment with the capture process and hopefully improve accuracy. I will redo the model slightly larger with the CNC. MDF promises to be a less distracting material to touch. Additionally the fuzziness of MDF is closer to the texture of a hairy spider.

Final Project Milestone 3 – David Lu

Assignment,Submission — David Lu @ 11:49 pm

Milestone 3: make the hardware

Final Project Milestone 3 – Mauricio Contreras

Assignment,Final Project,Robotics,Submission,Technique — mauricio.contreras @ 10:26 pm

My original 3rd milestone had to do with connecting a haptic feedback controller with the simulation of robotic motion, which by this time had turned into real motion, and the device chosen as described before is a smartphone since it provides an IMU and a vibrator, all with a standard and well proven programming API.

Limitations of IMU standalone motion tracking

My original intent was to use the device’s IMU to track position and orientation, each in 3 axis, providing effectively 6 degrees of freedom. My pursuit is for a very natural gestural interaction that would mimic one’s own hand orientation and position in space, to be imitated by the robot changing it’s own head position and orientation. My assumption was that standalone positioning based on integrating the accelerometer’s readings twice was a method that must have been solved by now, and I started searching for code. Yet, to my surprise, it seems this is not true and the constraints lie mainly on the double integration, the first of which leaves a constant error, and hence the second multiplies that constant with time, meaning the error grows linear with time! The drift most algorithms (at least the ones available on the web) render is even of tens of centimeters per second, which is completely unusable for the application in mind. In the case of orientation, this is completely different because there is only one integration to be made, plus there are at any given time 2 vectors of reference against which to correct: gravity and the magnetic north. To sum up, whereas one can get very accurate orientation from an IMU, linear positioning is still very much a work in progress, the underlying reasons being physical more than technological.

This immediately cut 3 degrees of freedom from my ideal application, the most important ones at that (the assumption being that one can probably use tricks to change the head’s orientation but use real degrees of freedom for it’s position, as opposed to the other way round. This is pure intuition though). I faced the decision of changing technology to visual tracking or keep using the IMU, now only with orientation. Even though kinect based motion tacking seems to be pretty plug&play these days, I had no previous experience and decided the semester was too advanced to have a setback as not being able to show anything functional in the end, whereas I was already somewhat acquainted at this time with the smartphone workflow I had developed. I decided then to stay on this path.

Orientation based linear motion control, first tests

I devised a TCP/IP socket based client (Android smartphone) – server (robot controller) application. It uses the smartphones orientation (software sensor provided by Android based on fusing the raw information from accelerometer, gyroscopes and magnetometer/compass) in each axis to generate steps that offset the robots head position in each axis.

The motion result was pretty much just as cut as what I had obtained with hardcoded targets, which left me with a feeling of disappointment. See video below, and please notice how unnatural this piecewise movement feels.

This piecewise motion is not related to the smartphone input information, but to the way the robot is controlled. Through the trials, becoming acquainted with people who have done extensive work with the robots (Mike Jeffers, Madeline Gannon, Zack Jacobson-Weaver, Ali Momeni, Jaremy Ficca, Josh Bard, Kevyn McPhail, up to then) and online research, I came to know that at least ABB robots, being developed for industrial use, are aimed towards rigid precision. This means motion commands are based on targets and are not meant to be interrupted in the middle, which is exactly what is required for responsive gestural control (real time interrupts). The next and final milestone shows the way of how I’ve dealt with this limitation.

Final Project Milestone 3 – Ding Xu

Audio,Final Project,Machine Vision,OpenCV — Ding Xu @ 10:24 pm

1. GPIO control board soldering

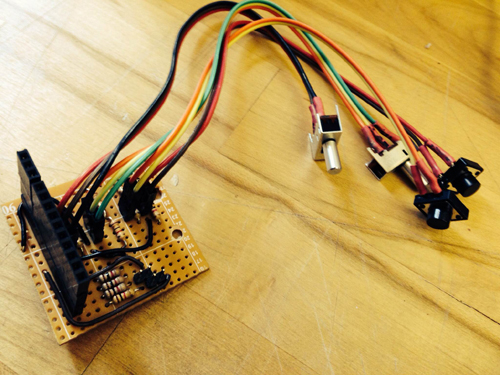
In order to use GPIO of RPI for digital signal control, I built a control protoboard  with two switches and two push buttons connecting a pull-up/pull-down registers respectively. A female header was used to connect the GPIO of RPI to get the digital signal.

In RPI, I used the library WiringPi for GPIO signal reading. After compiling this library and include the header files, three easy steps are used to read the data from digital pins: (1). wiringPiSetup() (2). set up pinmode: PinMode(GPIOX,INPUT) and (3). digitalRead(GPIOX) or digitalWrite(GPIOX)

photo_7(1)


2. software design

In openframeworks, I used  the library Sndfile for recording and ofSoundPlayer for sound output. There are two modes: capture and play. Users are expected to record as many as sounds in their lives and take an image each time recording a sound. Then in the play mode, the camera will capture a surrounding image and the sound tracks of similar images will be played.  The software workflow is as follows:

Capture:

Play:

code

3. system combination

Connecting the sound input/output device, RPI, singal control board and camera, the system is as follows:

photo_31

photo30

Final Project Milestone 3 – Ziyun Peng

Assignment,Final Project,Max,Software — ziyunpeng @ 10:05 pm

Since my project has switched from a musical instrument to a beauty practice instrument that’s used to play the face yoga game that I’m going to design, hence my 3rd milestone then is to make the visuals and the game mechanics.

First is to prepare the video contents. What I did was to split the videos into 5 parts according to the beauty steps. After watching each clip, the player is supposed to follow the lady’s instruction and hold the gesture for 5 seconds – being translated in the language of the game is to move the object on the screen to the target place by holding the according gesture.

The game is made in processing, and it’s getting gesture results from the sensors in the wearable mask in Max/MSP via OSC protocol.

max_patch


Examples are shown as followed:

game_step_1


game_step_2

video credits to the wonderful face yoga master Fumiko Takatsu.


Final Project Milestone 3 – Haochuan Liu

Assignment,Final Project,OpenCV,Software — haochuan @ 9:51 pm

In my milestone 3, I’ve reorganized and optimized  all the parts of my previous milestone including optical character recognition in openframeworks, communication using OSC between openframeworks and puredata, and all of the puredata effect patches for guitar.

Here is the screenshot of my drawable interface right now:

Screenshot 2013-11-25 22.14.49

Here is the reorganized patch in puredata:

Screenshot 2013-11-25 22.17.13


Also, I’ve applied the Levenshtein distance algorithm to improve the accuracy of the optical character recognition. For a number of tests made with this algorithm, the recognition accuracy can reach about 93%.

I am still thinking of what can I do with my drawable stompbox. For the begining, I was thinking this instrument could be a good way for people to play guitar and explore the variety of different kind of effects. I believed that using just a pen to write down the effects you want might be more interesting and interactive instead of using real stombox, or even virtual stompbox in computer. But now, I have realized that there is no way for people to use this instrument instead of a very simple controller such as a foot pedal. Also, currently just writing the words to get the effects is definitely not a drawable stompbox.


Next Page »
This work is licensed under a Creative Commons Attribution-Noncommercial-Share Alike 3.0 Unported License.
(c) 2024 Hybrid Instrument Building 2014 | powered by WordPress with Barecity