Connecting simple analog sensors: Photoresistor to Microcontroller
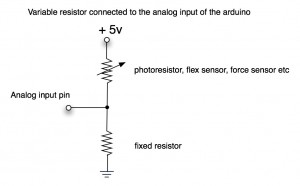
Simple circuit for connecting a variable resistance sensor to a micro-controller (with details regarding our favorite microcontroller the Arduino-compatible Teensy):
- “Analog input pin”: connection to one of the analog sensing pins (pins 11-21 of a for a Teensy 2.0)
- “photoresistor, flex sensor, force sensor, etc”: any variable resistance component
- “fixed resistor”: the value of this resistor should be selected based on the resistance range of the sensor
- “+5V”: connection to the microcontrollers +5V pin (labeled “VCC” on the Teensy 2.0)
- Ground: connection to the microcontrollers Ground (labeled “GND” on the Teensy 2.0)
